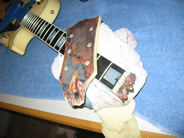
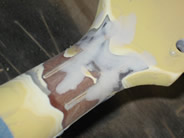
 You can see the dried epoxy in the original repair attempt, what a mess, not to mention this is a tough break to repair. now we have to cleanup somebodies mess removing dried glue and most likely some material. In a word UGLY You can see the dried epoxy in the original repair attempt, what a mess, not to mention this is a tough break to repair. now we have to cleanup somebodies mess removing dried glue and most likely some material. In a word UGLY
|
|
 The other guy apparently went to Lowe's home improvement and had them match the paint and sprayed exterior house paint on the guitar. Now I have another big problem, all that house paint has got to go, can't paint over that.... What a mess The other guy apparently went to Lowe's home improvement and had them match the paint and sprayed exterior house paint on the guitar. Now I have another big problem, all that house paint has got to go, can't paint over that.... What a mess
|
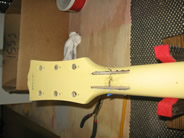
 Glue up with yellow glue, never use epoxy on a quality instrument, and I let it set clamped up for 10 days. Glue cures like rubber 90% cure in 24 hours and then 90% of the 10% that;s left in the next 24 hours and so on and so on. Yes is it servicable in 24 hours as the instructions say, but this guy has learned the hard way and I wait 10 days. Glue up with yellow glue, never use epoxy on a quality instrument, and I let it set clamped up for 10 days. Glue cures like rubber 90% cure in 24 hours and then 90% of the 10% that;s left in the next 24 hours and so on and so on. Yes is it servicable in 24 hours as the instructions say, but this guy has learned the hard way and I wait 10 days.
|
|
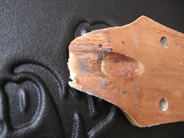
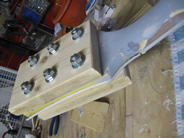
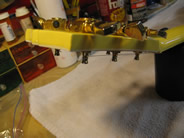
 Out of the clamps and back form the milling machine with 3/32 slots deep into the neck and headstock. You can see that the slots go all the way through the headstock on the left of the pic. When dealing with a previous repair done with epoxy there are several big issues and the biggest is that the epoxy penetrates into the grain of the wood sealing it up. Out of the clamps and back form the milling machine with 3/32 slots deep into the neck and headstock. You can see that the slots go all the way through the headstock on the left of the pic. When dealing with a previous repair done with epoxy there are several big issues and the biggest is that the epoxy penetrates into the grain of the wood sealing it up.
|
There will be nowhere for the yellow glue to go other than the surface. I always moisten the wood before gluing to start the grain to absorbe the glue, with the epoxy there it's like trying to glue glass. Therefore I opt for the splints to increase the surface area that makes the gule joint strong and give some additional strength to the neck
|
|
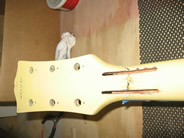
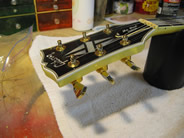
Splints are plywood from the hobby shop. Starts as 1/8 inch, I use 40 grit sand paper to remove material on both sides to make snug fit, not to tight, you must leave room for the glue and you want a rough surface for the glue to grab, that's why the 40 grit.
Splints glued and detailed in place. That gray you see is auto body filler, I have used it for years on painted guitars, works great and finishes great.
|
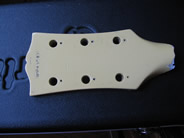
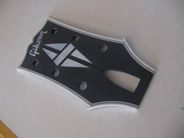 New overlay form my friends at CroxGuitars. I tried buying these in the US from several people on Ebay but they were not at all as accurate, or as flat as the Crox product, The Crox Guitar overlay fits exactly, unlike the others that I tried! Great overlays!!!! New overlay form my friends at CroxGuitars. I tried buying these in the US from several people on Ebay but they were not at all as accurate, or as flat as the Crox product, The Crox Guitar overlay fits exactly, unlike the others that I tried! Great overlays!!!!
|
|
 My home made overlay clamp, I put blue painters tape over the front side of the overlay to protect it, also you can see that the clamp is staggered with the overlay side staggered back to provide good clamping pressure for the entire overlay. See how nicely the overlay fits, this is much better than some and has ample binding to make a great finish. My home made overlay clamp, I put blue painters tape over the front side of the overlay to protect it, also you can see that the clamp is staggered with the overlay side staggered back to provide good clamping pressure for the entire overlay. See how nicely the overlay fits, this is much better than some and has ample binding to make a great finish.
|
 Here we are about 1/2 way through the detailing of the overlay binding. as you can see it looks OK but doesn't stand out as it should. I always get a little paint on the binding and the remove it with a blade, working under a magnifying lens work light Here we are about 1/2 way through the detailing of the overlay binding. as you can see it looks OK but doesn't stand out as it should. I always get a little paint on the binding and the remove it with a blade, working under a magnifying lens work light
|
|
 Now.... That's what we want to see, nice, smooth, straight, shinny and it feels and plays really good to. Now.... That's what we want to see, nice, smooth, straight, shinny and it feels and plays really good to.
If this guitar could talk I think now it might say.... Thanks Mike
|
| |
|
|
| |
|
|